Showing posts with label film. Show all posts

WWPD 2013: Deluge Disappointment

So yesterday was the much anticipated [by me, at least] World Pinhole Photography Day. I've been making pinhole cameras all the time like crazy for something like two weeks, and then what? Deluge. Really. It's been raining cats and dogs since last night. And my biggest pinhole adventure today resulted in me taking a picture from my backyard's balcony in a ten-minute break of heavy pouring.

So this is what my World Pinhole Day 2013 consisted of: a single, instant picture taken with this instant pinhole camera in a ciggy box.


Small wonder the weather sucks, it's Sunday, after all.

World Pinhole Photography Day: what a bummer. Hope the weather gets better asap as I have too many pinhole cameras to test.

WWPD 2013: Instant Pinhole Camera for Polaroid film

If you've been following my blog lately, you might have noticed that I've found myself more and more intrigued by the magic world of pinhole photography. And since World Pinhole Photography Day is just around the corner, I'm getting ready to celebrate it with a whole arsenal of pinhole cameras I've made myself. Here's my latest creation and a step-by-step tutorial in case you want to make one too: an instant pinhole camera for Polaroids!


What you need for this project:
• A box of Polaroid film [and the film too, of course!]. Since original Polaroid film is quite hard to find these days, I used Impossible film, namely PX 70 Color Protection.
• A tiny piece of aluminum [I cut mine out of an empty soda can]
• Black electrical tape, scissors, a pin and a marker


First, open your film box and take the film cartridge out. If you're using Impossible film like I did, you will notice that the box it's all covered with silvery plastic inside, even in the corners, making it light-proof except for the part you opened to take the film out. This makes our job easier, as we will only have to cover one side [and its two corners] with black tape, but this will be the very last step.

So, take your empty box and mark its center.


Now cut a little square aroung that spot.


Take an empty soda can and cut a small piece of tin out of it, roughly as big as the square hole you've just cut out of your box, and pierce a, hole through it using a pin. Do not make the hole too big, just enough for a tiny ray of light to pass through it, and try to make sure the edge is as cleas as possible. When making my pinhole, I usually put my aluminum piece of a rubber, as it makes it easier to pierce it without shaking the pin. Also, it prevents you from turning your table into a colander ;-)


Next, tape your piece of aluminum right on the hole in your box. Use black tape to make sure light will not leak in from its sides.


Now it's time to make a shutter for your instant pinhole camera. You have many, many options here, but I think that the easiest one is to cut some black tape and fold it on itself leaving just a tiny sticky part on top of it.


Then you only have to glue the sticky part on the box a bit above your pinhole...


 ...And keep it in place using another piece of [possibly, not too sticky] tape on the bottom.


What now?

You will now have to go to a darkroom [any very dark room will do], take film off your cartridge and put it into your brand new pinhole camera*, tape the open side of the box to make it 100% light-proof, turn on the light and go take pictures.

*Unlike Fuji Instax Mini film, Polaroid film's light sensitive side is the front [the side where the picture is], so you will have to put it into your pinhole camera with the front side facing the pinhole.*

To take a photo, just lift the shutter so that light can get inside through the pinhole. I usually determine the exposure time with my pinhole cameras following this exposure guide:


I'm not very familiar with this film yet, so I cannot recommend a more detailed exposure times chart. This film is rated as ISO 125, but it seems a bit faster to me, so I would shoot it as ISO 200, but that's just an opinion. I guess the best thing to find out the perfect exposure time is through trials and errors.

Remember to keep your pinhole camera as steady as possible while taking a picture, and to make sure the shutter is perfectly closed once you're done exposing the film.

Once the film has been exposed, you have to wait 'till you get to the dark room before taking it out of the pinhole camera. Then, in complete darkness, you will have to press the white edges to activate the film development process. I would not roll a pen on the film as when I tried it with Fuji Instax Mini, the results were horrible. Instead I gently rubbed the white edges for a moment and then put my Polaroid in a book and left it there for a whole hour, as it takes about forty minutes for the picture to fully develop according to the sheet that comes with the film.

Now, let me show you my very first picture with this pinhole camera:

Taken indoors, 13 minutes exposure. It's very blurry and a bit reddish but I'm super happy with it!

I will take more pictures with this pinhole camera on World Pinhole Photography Day next April 28th and share them here, so make sure to drop by if you're into this sort of things!

In the meantime, I'd like to share a few more tips that might be helpful if you're experiencing the same problems that I've had when playing with pinholes and instant film.

First problem: How do I get the film out of the cartridge?
This part is a bit tricky, especially because you'll be doing it in the dark. I can't help you that much on this, you just have to lock yourself in the dark room and try with your fingers, scissors, skrewdriver, whatever. Please remember that Polaroid/Impossible film cartridges have a battery inside, so be careful.

Second problem: What do I do with the other film sheets?
It's up to you. You can keep the other 7 films in a light-tight container [perhaps another film box completely covered with black tape] and feed them to you pinhole camera after you're done with the first picture. This isn't much convenient, as the hardest/most boring part of this project is the one about putting the film inside the camera, in my opinion. This is why I decided to make two more pinhole cameras following this very same process, which enables me to take more than one single Polaroid at a time. I would have made more, but I only had three boxes of Impossible film, so I had to store the four other film sheets in a light tight box, but I'll definitely build more as soon as I find some similarly sized boxes.

I think this is it. I really hope you enjoyed this tutorial and I would love to hear your advice or stories about pinhole photography, so feel free to share!

With World Wide Pinhole Day just a few days ahead, fancy building a pinhole camera yourself?

Here's a tutorial to make a 35mm pinhole camera out of an empty film box while here's how to make one out of a chewing gum box. Found an old 110 cartridge in a drawer? Let's turn it into a 110 pinhole camera! Die-hard fan of instant film? Here's how I made an instant pinhole camera out of a ciggy pack, but if you own an Instant Back+ you should definitely check this out!


WWPD 2013: Chewing Gum Box 35mm Pinhole Camera Tutorial

Today, while I was drinking my umpteenth soda of the day, I felt like a chewing gum. With the shewing gum box in one hand and a can in the other, I had the epiphany: tiny box + aluminum = pinhole camera!


To make this revelation turn into a pinhole camera I used the afore-mentioned chewing gum box and can, black insulating tape, normal tape, a pencil, a marker, a pin, scissors and two rolls of 35mm film [an empty one and a "fresh" one].

First, I decided where my film would pass through the box. I marked two parallel lines on the front [representing very approximately the film]...


...And one per side, as tall as the film cartridge.


Back to the front, I marked [again, with my distinctive scientific precision] the centre of the "film path".


I cut a small rectangular window there...


...And taped a little piece of tin foil [cut out from the soda can] that I had pierced right in its centre with the tip of a pin.


I then cut along the two lateral lines to make the slits through which film would get through the "camera". I used a pen to crack the slits a little more in order to make it easier to insert the cartridge's edge.


I mentioned you need two rolls of film. Actually, you only need one, the other one can be an empty cartridge, as the one I used. 


It is so wrecked because lately I've started developing film at home but have yet to master how to pull film out of the cartridge. Anyway, it doesn't really matter if your empty cartridge looks as bad as mine as long as you can still turn the spool, as you will have to tape about every inch of it soon.

Now it was time to put the film in my soon-to-be pinhole camera. Here I was faced with two options:

1. Shooting the film the good old way and get normal pictures


2. Shooting the film the other way and get redscale pictures.


As it's been a while since the last time I shot some redscale film, I decided to go for the redscale.
I inserted the film slotting the cartridge in into the chewing gum box and made the film go all the way through the other slit. 


I used black tape to hold everything still and to prevent light from leaking in.


I then taped the fresh film to the last bit still coming out from the old cartridge's spool.


I wound a bit to make sure the film inside was well stretched.


Next I covered the old cartridge and most of the box as well, except for the top of the cartridges [so that I could still advance/rewind the film] and the pinhole.


I made my shutter folding on itself a piece of tape as long as the chewing gum box, leaving a sticky part on top.


I glued the sticky part to the top of my camera, adding another piece of tape [the red one] on the bottom to keep the shutter closed. To open it and take a picture, all I have to do is lifting the long black tape.


I added some more red tape on the top to keep the shutter closed better... and some more on the sides just because.


To advance the film, I put a paper clip in the top of the old roll's cartridge, making two full turns to advance to the next frame. I've read somewhere that one turn and a half is enough, but I personally prefer to make two whole turns.

Also, I keep by my side this helpful exposure guide which comes with the Diana Multi Pinhole Operator to help me determine exposure times:


I will share my results (or whine about my epic failure) as soon as I get the roll developed. 

With World Pinhole Photography Day just a few days ahead, fancy building a pinhole camera yourself?


Have fun and feel free to share your own pinhole projects!

WWPD 2013: 110 Film Pinhole Camera Tutorial

To celebrate this year's World Pinhole Photography Day, I've been making pinhole cameras in all the film formats I'm familiar with: 35mm, 120, instant film and now... 110!

Since Lomography brought back 110 film, I’ve been thinking about making a 110 pinhole camera. I was pretty worried that, with such a tiny format, the pictures’ quality would not be outstanding, but hey, we’re plastic-lens-lovers, aren’t we? So nevermind quality and let’s have some crafty fun!


So, here's how I made my baby pinhole camera. 
All you need is: a 110 film cartridge, a not-so-big piece of cardboard, a pencil, a ruler, a little piece of tin (you can cut it out off any can), a pin, black/dark electrical tape and scissors (and maybe a cutter or an x-acto knife)... nothing fancy, as you can see!

First things first: let's take a look at the anatomy of 110 film.
Here we can see the top and back sides of the cartridge, where the film counter is...


...While here's the front/bottom sides with the film and the advance wheel.


Once we'll be taping our cartridge to make it light-proof, the only two things we will never ever cover with tape are the exposure counter and this tiny little wheel here, which is the only way we have to advance film.


Now, the first thing I did was measuring the distance between the two bumps on the front of the cartridge. 


Then I measured both the height and depth of the cartridge and cut a small rectangle out of my piece cardboard, tracing on it the outline of both the top and the bottom of the cartridge.


Next I traced the diagonals in the part corresponding to the front and drew a small rectangle there too...


...Which I then cut out...


Here's where the little piece of tin foil will be, i.e. here's where the pinhole will be.
So I flipped the whole thing and taped the tin foil bit on the back of my cardboard "camera body".


I then flipped my cardboard piece again and I marked the tin foil-rectangle's diagonals too and, using a pin, I pierced a hole in the centre of it.


Now I was ready to tape the carboard to the cartridge. As I was using some recycled cardboard, I taped it with some washy tape. 


If you wish to do the same, be careful: you will either avoid covering the piece of tin foil, or you'll have to pierce a hole through the tape (like I did) for the pinhole.


Also, remember not to cover the back of the cartridge (where the exposure counter is) and the advancing wheel on the bottom.


Everything is now in place, so it's time to make sure the pinhole camera is truly light-proof. I know Lomographers LOVE light leaks, but when it comes to pinhole cameras, light leaking in means best case scenario, über-exposed pictures, or, mostly, burnt pictures.
I don't know what's going on 'round here, but I went to three different hardware stores and couldn't find black electrical tape, so I bought three rolls of blue tape and used two layers. 
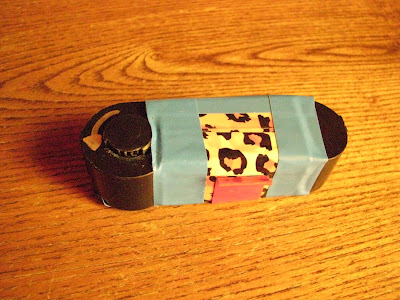
Anyway, here's the mummy/pinhole camera, 100%light-proof (except for the pinhole, of course).


Last but not least, the shutter. Mine is really simple: just take a piece of black tape and stick it on the pinhole. (I folded the last bit of it on itself so that it doesn't stick to the "camera" and it's easier to lift).  I used blue tape and covered it with red tape just because. Do not use red tape only as the light would definitely leak in.


Lift it up to take a picture...


Stick it back to close the shutter.


Turn the advance wheel counter-clockwise to go to the next frame. It was a bit stiff at the beginning so I had to use my car keys to move it, then it became smoother, so don't worry if it seems to be stuck, just force it a bit and it will work.


I absolutely love the exposure counter on the back: it makes 110 pinhole cameras much more convenient than those in the 35mm format!


I've built this camera for World Pinhole Photography Day, which is next April 28th, so I haven't tested it yet, but in case you want to build a pinhole camera and need an exposure guide, I'd recommend the one that comes with the Diana Multi Pinhole Operator. If you use Lomography Color Tiger film like I did, remember that it is an ISO200 film.


I will share my results (or whine about my epic failure) as soon as I get the roll developed. 
With World Pinhole Photography Day just a few days ahead, fancy building a pinhole camera yourself?