Showing posts with label instant pinhole camera. Show all posts

WWPD 2013: Instant Pinhole Camera for Polaroid film

If you've been following my blog lately, you might have noticed that I've found myself more and more intrigued by the magic world of pinhole photography. And since World Pinhole Photography Day is just around the corner, I'm getting ready to celebrate it with a whole arsenal of pinhole cameras I've made myself. Here's my latest creation and a step-by-step tutorial in case you want to make one too: an instant pinhole camera for Polaroids!


What you need for this project:
• A box of Polaroid film [and the film too, of course!]. Since original Polaroid film is quite hard to find these days, I used Impossible film, namely PX 70 Color Protection.
• A tiny piece of aluminum [I cut mine out of an empty soda can]
• Black electrical tape, scissors, a pin and a marker


First, open your film box and take the film cartridge out. If you're using Impossible film like I did, you will notice that the box it's all covered with silvery plastic inside, even in the corners, making it light-proof except for the part you opened to take the film out. This makes our job easier, as we will only have to cover one side [and its two corners] with black tape, but this will be the very last step.

So, take your empty box and mark its center.


Now cut a little square aroung that spot.


Take an empty soda can and cut a small piece of tin out of it, roughly as big as the square hole you've just cut out of your box, and pierce a, hole through it using a pin. Do not make the hole too big, just enough for a tiny ray of light to pass through it, and try to make sure the edge is as cleas as possible. When making my pinhole, I usually put my aluminum piece of a rubber, as it makes it easier to pierce it without shaking the pin. Also, it prevents you from turning your table into a colander ;-)


Next, tape your piece of aluminum right on the hole in your box. Use black tape to make sure light will not leak in from its sides.


Now it's time to make a shutter for your instant pinhole camera. You have many, many options here, but I think that the easiest one is to cut some black tape and fold it on itself leaving just a tiny sticky part on top of it.


Then you only have to glue the sticky part on the box a bit above your pinhole...


 ...And keep it in place using another piece of [possibly, not too sticky] tape on the bottom.


What now?

You will now have to go to a darkroom [any very dark room will do], take film off your cartridge and put it into your brand new pinhole camera*, tape the open side of the box to make it 100% light-proof, turn on the light and go take pictures.

*Unlike Fuji Instax Mini film, Polaroid film's light sensitive side is the front [the side where the picture is], so you will have to put it into your pinhole camera with the front side facing the pinhole.*

To take a photo, just lift the shutter so that light can get inside through the pinhole. I usually determine the exposure time with my pinhole cameras following this exposure guide:


I'm not very familiar with this film yet, so I cannot recommend a more detailed exposure times chart. This film is rated as ISO 125, but it seems a bit faster to me, so I would shoot it as ISO 200, but that's just an opinion. I guess the best thing to find out the perfect exposure time is through trials and errors.

Remember to keep your pinhole camera as steady as possible while taking a picture, and to make sure the shutter is perfectly closed once you're done exposing the film.

Once the film has been exposed, you have to wait 'till you get to the dark room before taking it out of the pinhole camera. Then, in complete darkness, you will have to press the white edges to activate the film development process. I would not roll a pen on the film as when I tried it with Fuji Instax Mini, the results were horrible. Instead I gently rubbed the white edges for a moment and then put my Polaroid in a book and left it there for a whole hour, as it takes about forty minutes for the picture to fully develop according to the sheet that comes with the film.

Now, let me show you my very first picture with this pinhole camera:

Taken indoors, 13 minutes exposure. It's very blurry and a bit reddish but I'm super happy with it!

I will take more pictures with this pinhole camera on World Pinhole Photography Day next April 28th and share them here, so make sure to drop by if you're into this sort of things!

In the meantime, I'd like to share a few more tips that might be helpful if you're experiencing the same problems that I've had when playing with pinholes and instant film.

First problem: How do I get the film out of the cartridge?
This part is a bit tricky, especially because you'll be doing it in the dark. I can't help you that much on this, you just have to lock yourself in the dark room and try with your fingers, scissors, skrewdriver, whatever. Please remember that Polaroid/Impossible film cartridges have a battery inside, so be careful.

Second problem: What do I do with the other film sheets?
It's up to you. You can keep the other 7 films in a light-tight container [perhaps another film box completely covered with black tape] and feed them to you pinhole camera after you're done with the first picture. This isn't much convenient, as the hardest/most boring part of this project is the one about putting the film inside the camera, in my opinion. This is why I decided to make two more pinhole cameras following this very same process, which enables me to take more than one single Polaroid at a time. I would have made more, but I only had three boxes of Impossible film, so I had to store the four other film sheets in a light tight box, but I'll definitely build more as soon as I find some similarly sized boxes.

I think this is it. I really hope you enjoyed this tutorial and I would love to hear your advice or stories about pinhole photography, so feel free to share!

With World Wide Pinhole Day just a few days ahead, fancy building a pinhole camera yourself?

Here's a tutorial to make a 35mm pinhole camera out of an empty film box while here's how to make one out of a chewing gum box. Found an old 110 cartridge in a drawer? Let's turn it into a 110 pinhole camera! Die-hard fan of instant film? Here's how I made an instant pinhole camera out of a ciggy pack, but if you own an Instant Back+ you should definitely check this out!


WWPD 2013: Instant Pinhole Camera in a Ciggy Pack

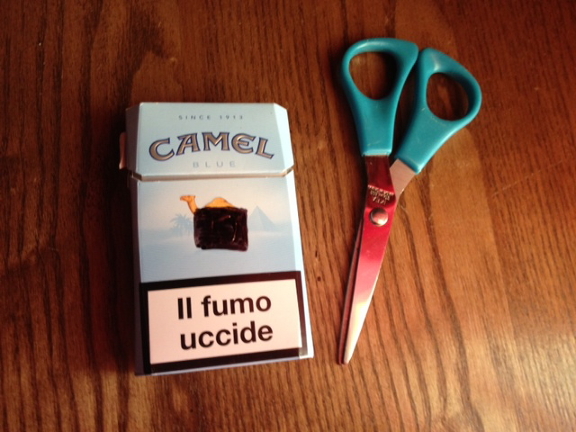
Smoking is such a bad, bad habit and all of us smokers should quit asap for our own good and for the people around us as well. While working on it, though, we could still turn empty cigarette packs into very basic pinhole cameras. Of course you could follow this tutorial and turn it into a 35mm pinhole camera, but as you can see in the picture below, the average cigarette pack has the same size of Fuji Instax mini film, so you may want to try making an Instant Pinhole Camera!


You will need: a pack of cigarettes, black electrical tape, a piece of aluminum (you can cut it out of an empty soda can), a pin, scissors and a marker... and instant film, of course!

First, take your ciggy pack and take out the plastic wrapping outside and the silver paper inside.


Mark the centre of the film area (you can use an old instax photo to get the idea).


Draw a little square there...


And cut it out.


Now you will need a piece of thin tin that  you can easily cut out of an empty soda can. Pierce a hole through it using a pin...


...And tape it on the pack's window that you've just cut out.


You can now start covering your whole camera with black tape to make it light-proof, except for the part that needs to be opened in order to put the film inside it. The black tape I use is quite large, so I decided to leave some extra tape already half-glued to the pack so that it was easier for me to completely wrap my camera with tape in the darkness after inserting the film.


By the way, you will have to put the film in with its back facing the pinhole [see picture below], but DO NOT insert film now: you can only do so in a completely dark room!


Before putting the film in, you will have to make some sort of a shutter, or light will leak in through the pinhole. I made mine folding a long piece of tape on itself. I put it on the front of my camera and taped it with a red tape band on top to keep in place and another smaller piece of red tape on bottom which keeps the shutter closed. To open it, I only have to lift the red tape and the shutter itself.


Now that your camera is almost entirely light-proof, you can finally put the film in it. This is the most difficult part of this project, so let's first talk about the issues and then let's (try to) find a solution.

As you already know, instant film comes in cartridges, and it's not easy to take single film "sheets" out of it. If you have an "Instant Back+":http://shop.lomography.com/it/accessories/camera-accessories/backs/lc-a-instant-back , no problem: you can build a DIY Instant Pinhole Camera like this one  and the Instant Back+ will do all the dirty job for you.

The camera we're building here does not require an Instant Back+, but this means that we have to use this camera with one film sheet at a time, as it would be quite difficult to build a mechanism that ejects a single sheet of film at a time.

So, basically, we will take the ten film sheets out of the cartridge in complete darkness, put one in the camera, take a picture, go back to our "darkroom", take the film out, press the white edges where the chemical stuff is to develop the picture, turn on the lights and finally see our picture.

This is going to take some time, and in order not to waste the film you will have to keep the nine sheets yet to be exposed in a light tight container and repeat the whole process each time you want to use this instant pinhole camera. 

Frankly, this would be quite a drag, especially if you consider that it takes more time to put the film into the camera than making the camera itself. That's why I decided to make more than just one camera, so that once I opened the cartridge I could already put all the ten film sheets in different pinhole cameras and have them ready to use.

So, here are two other instant pinhole cameras I made out of cigarette packs:


What happened to the other seven sheets of film from that same cartridge, you ask?

I made some other pinhole cameras which are quite different from this project. If you're curious about it, just drop by in the next few days as I'll be sharing them here on my blog.

Back to this current project, another major problem when you do not have an Instax Back+ is that you will have to find a way to press the chemicals contained in the white parts of the film in order to develop your picture.

The thing is: if you don't press it enough, the photo will not fully develop; at the same time, if you push it too much, you will end up with a black liquid endlessly flowing out of your film. This personally happened to me when I was trying to develop the first picture I took with my DIY single use instant pinhole camera:


You can now only see a tiny black stain in the corner, but you cannot even imagine how my kitchen sink looked after the film started bleeding an awful lot black ink or whatever it was!

This photo was a total failure: I tried to develop it rolling a pencil on it a few times, so many times, actually, and pushing it so much that it started spilling that black thing.

Yet, the picture was still looking too pale, so I had the not-so-brilliant idea of heating the film using a lighter. The photo turned a bit purple at the beginning, then all of a sudden it turned all blue.

Thankfully, I was way luckier with the second trial:

This time the picture looks pinkish because right after taking my photo I put my pinhole camera in the freezer and left it there for a couple of minutes, and only then I took it to my darkroom to take the picture out and develop it. This time I pressed it more gently, rubbing the white parts with my fingers only, and the results are better, I guess... If you do not consider the fact that I was aiming at my dogs but didn't apparently managed to get them in my picture.

I haven't tested the third ciggy-cam yet as I want to keep it for World Pinhole Photography Day next April 28th, but again, I'll share that picture and other shots from all the pinhole cameras I've built for the occasion here as soon as I get to process them.

So lastly, a quick recap:

1. Make your camera, cover the pinhole with the shutter, make sure no light is leaking in and only leave the upper part of the ciggy pack to put the film in.

2. You will have to go to a completely dark room to open the film cartridge and load the film to your camera.

3. Use the exposure guide below to determine how long to keep the shutter open [remember that Fuji Instax Mini film is a ISO800 film].


4. Once you've taken your picture, close the shutter and keep the camera closed until you get into the darkroom again.

5. Once there, open the camera, take the film out, and press the white edges to make the developing process start. Do not press too much or you'll end up with black chemical stuff everywhere!

6. Only turn on the light after you pressed the film, starting the developing process. If you expose the film before it is beginning to develop, it will be light-sensitive still, and you will burn it.

7. Once you've opened it, the film cartridge cannot be exposed to light. Keep it in a light-tight container. You can build one using another pack of cigarettes completely covered with black tape. Otherwise, make a pinhole camera for each of the ten film sheets in pack so that you will have them ready to use.

I really hope you enjoyed this clumsy tutorial and had fun making your own instant pinhole camera in a ciggy pack. If you have any advice or want to share any pinhole-related story, I'd be more than happy to hear them!

Feeling the Pinhole DIY Fever? How about making your own 35mm pinhole camera out of a chewing gum box ? Wanna try something a little more complicated? This tutorial to make a 35mm camera out of an empty film pack can feel quite challenging. Love the tiny 110 film? You definitely gotta take a look at this 110 pinhole camera tutorial! Still want more instant film pinhole goodness? Then this DIY Instant Pinhole Camera is absolutely worth checking out!


Dark Dark Dark


Barely lit indoor trials with my Instant Pinhole Camera. If you feel like making your own instant pinhole camera, here's the tutorial I shared last year, or click here to see how to turn an empty film box into a 35mm pinhole camera. More pinhole tutorials on their way :-)

WWPD Project #1: Instant Pinhole Camera Tutorial

Last year I built my very first pinhole camera less than a week after Worldwide Pinhole Photography Day. This time I want to make sure to celebrate it properly. I will build three pinhole cameras, one for each of the film formats I'm familiar with: 35mm, 120 and instant film.


The first of my three projects for this year's Worldwide Pinhole Photography Day was building a pinhole camera that works with instant film. I wanted to turn one of my SX-70s into a pinhole camera, but being the Impossible Project film so expensive, I decided to try this easier and cheaper version first. I am aware that the Diana F+ has a pinhole function, and I know there is a Diana Multi Pinhole Operator camera too, but lately I'm feeling crafty [well, sort of].

This project only takes about one hour and you don't really need to be a crafty person to make your own instant pinhole camera, you only need an Instant Back+ and a few items you can surely find at home:


You will need:
1. An Instant Back+ [I used the Diana F+ Instant Back]
2. A box fitting your Instant Back+ [approx 12 x 9,5 cm, you can also make one using cardboard]
3. Cardboard [to make sure the box is thick enough to be light-tight and to build the shutter]
4. A small piece of thick aluminum foil [you can cut one out of an empty can, or you can use a jar lid just like I did]
5. A needle [you could use a hammer to make the pinhole, especially if you're using a jar lid, and a clothespin]
6. Black vynil electrical tape
7. Masking tape or just normal tape
8. Scissors and a cutter
9. Permanent marker
10. Black paint and a brush
11. A sound-track
12. Instant film


First of all, take a look at your box. In my case, it was't thick enough, so I decided to add a piece of cardboard inside to make sure the light would not leak in from the front of my soon-to-be pinhole camera. Cut a 12 x 9.5 piece of cardboard and draw a line at 2.5cm from the bottom. Mark the two diagonals on your piece of cardboard in order to find its centre. 


You need to exclude the 2.5cm margin at the bottom as this area in the Instant Back+ does not correspond to the place where the film is, so if you mark the two diagonals without taking the margin into account, you will not find the exact place to put your pinhole. 
You will have to mark this margin and the diagonals on the back of the box as well.

Now you will have to cut out a small window around the point where the two diagonals meet both on the piece of carboard and the box. Place your cardboard sheet inside the box and stick it to it. Use your black vynil electrical tape to cover the edges of the window.
I decided to add another piece of cardboard right on the 2.5cm margin in order to hold the Instant Back+ steady into the box, but I guess you can skip this part.


Check if there is any place the light might leak through. In case, cover it with vynil tape. Now you can paint the box all black inside.


While you're waiting for the paint to dry, you can make the actual pinhole. You will need a piece of thick aluminum foil: just cut a tiny piece of aluminum out of an empty soda can or use a jar lid. The pinhole has to be teeny-weeny [the smaller the pinhole, the sharper the image] and its border must be as sharp as possible. If you're using a piece of can, simply lay it down on the table [make sure the table is somehow safe from accidental punching] and punch it with the tip of the needle. You may want to hold the needle with a clothespin [like a wooden one] if you have very sensitive fingers. If you're using a jar lid like I did, I suggest you use a hammer, so that the hole's edges are clear. Again, you only have to punch it with the tip of the needle, you don't have to hammer like crazy. If you're feeling a little frustrated you can always have a break and go wave your hammer around somewhere else [just kidding].


Once the paint is completely dried, check again both the inside and the outside of the box and tape any corner, hole or crack on it.


Tape the pinhole to the box making sure it is virtually placed exactly where the two diagonals meet [you can do this looking at the box and pinhole against the light].


Your camera will now need a shutter. You can use a piece of black tape that you can remove when you want to expose the film and put back in place when you're done, or you can make something a little more crafty. Due to very limited skills, I made this slide shutter cutting two pieces of cardboard about the same size as my jar lid, then I stuck them together cutting out a part big enough not to cover my pinhole and to slide a piece of cardboard through to use as the actual shutter. Once again, I painted both of these pieces of cardboard black. I didn't take a picture of it, but you'll get the idea in the final photo.

Now you can put the Instant Back+ in place. You will load the film later, but now make sure you put some fresh batteries in it!
You will need lots of tape to hold it down to the box, so I suggest you use normal tape or masking tape first and only then black vynil tape to make sure your camera really is light-tight. Just make sure not to tape the pinhole itself, the film ejection slit of the Instant Back+, the Instant Back+'s back, and the tripod thread mount on the bottom of it... it will definitely come in handy, as we're talking about pinhole photography!


Finally, here's your pinhole instant camera. I know, it looks much like an ugly duckling, but you can add stickers, draw something cute on it, glue stuff to it... but most of all, you can take great, tiny pictures with it!


All you have to do now is load some film and go take a picture. Being Fuji Instant Mini a 800 ISO film I couldn't find an accurate exposure guide, so while I'm trying to figure out the proper exposure time I'm currently exposing my pictures for about half the time recommended for 400 ISO film in the guide that comes with the Diana Multi Pinhole Operator. Also, you can put a color filter on the pinhole, but then you will have to keep the shutter open a bit longer.


Here you can see some test shots taken indoor at noon; the exposure time was 3, 4 and 5 minutes respectively [pictures are 100% unedited].


Let me know if you try this very easy project, I'd love to see your results!